
Open up Photoshop, make a new image, and follow along with this tutorial.
1 – Creating some diamonds
 Make a new layer.
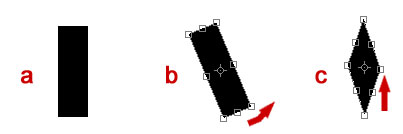
 Select a rectangular area, as shown in diagram [a].
 Fill the area with black.
Press Ctrl+T to Transform the selection. Move the cursor near the bottom right of your rectangle, so it turns into a curved arrow. This arrow allows you to rotate the object. Rotate your rectangle slightly, as shown in diagram [b].
While holding Ctrl and Alt, drag the rightmost point upwards, until the shape resembles a diamond (no need to be exact), as in diagram [c]. (Holding Ctrl allows you to move one corner by itself, and Alt mirrors your actions, which moves the leftmost point downwards in this case.)
Press Enter to confirm the changes.
2 – Replicating the diamonds
 With the Move Tool selected, hold down Alt, and drag your diamond somewhere else. This makes a copy of the diamond. Make about five copies of the diamond this way.
Once you've made your copies, press Ctrl+T to transform the current diamond. Drag its corner a bit, to make it different in some way.
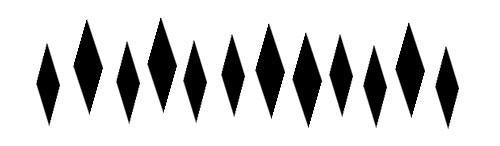
Hold Alt and use the Move Tool to make copies of your new diamond. Arrange all your diamonds in an irregular line, as shown. Vary the position of the diamonds a bit, but try to keep the bottoms of the diamonds all at around the same height.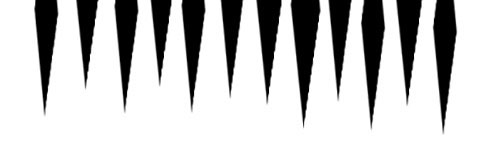
3 – Turning the diamonds into tiger stripes
Merge all your diamonds onto one layer. Do this by clicking on a layer in the layers list and pressing Ctrl+E to merge it with the layer below it. (Don't merge anything into the Background layer.)Press Ctrl+T to transform the diamonds. You may need to Zoom out (Ctrl -) at this point.
Elongate the selection, by dragging the bottom down and the top up. Drag the whole selection upwards, so you can only see the bottoms of the diamonds, as shown in the diagram. Grab the corner and rotate the stripes slightly.
If you're not happy with your stripes, click on the History tab, undo some steps, move your diamonds around, and try again.
4 – Adding a Wave to the stripes
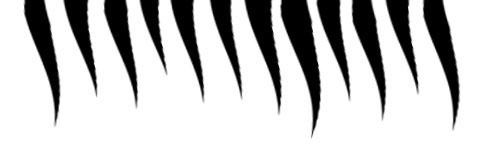
Click Filter, Distort, Wave. Set the Number of Generators to 1, the Wavelength to 120 (both sliders), and the Amplitude to 15 (both sliders).Click "Randomize" a couple of times, until you get some nice curves.
Click OK.

5 – Setting up a colour Gradient
 Select the Gradient Tool. In Photoshop 5.5, this is a tool on its own. In Photoshop 6.0 and 7.0, you'll need to hold down on the Paint Bucket Tool to see it.
Click on the visual representation of the Gradient at the top left of the screen. (If you're not using Photoshop 6.0 or 7.0, you'll need to click on the Options tab, and click "Edit" instead.)
Set up brown, orange, and white tabs as shown.
6 – Creating the tiger's fur
Click on your Background layer, then click and hold down the Gradient Tool at the top of your image. Move the cursor downwards, and then release the mouse button.To give the fur a realistic texture, click Filter > Noise > Add Noise. Put in 5% worth of Monochromatic, Gaussian noise.
Click Filter > Blur > Motion Blur. Set the Distance to 5, and choose a diagonal angle.
 To give the image a smooth transition from fur to blank white area, use the Brush Tool, with a soft brush about 45 pixels in size. Brush across the bottom of the image. Hold Shift while you do this, to keep the line straight.
7 – A shadowy text header
 Use the Text Tool to Type in your heading in black. I've used Palatino Linotype font here. Make the first letter bigger, and increase the letter spacing by putting a space between each letter (you can increase the Tracking instead, if you have the option.)
Right-click on this new text layer, and Duplicate it. Change the font colour to white.
Choose the Move Tool, and press Up Arrow, Left Arrow. This moves the white text, so that only a small part of the black text is visible, which makes it look like a shadow.You could use Blending Options to do this instead, but this method is easier, and can be done in any version of Photoshop.
Click File > Save For Web, and save your image as a Quality 60 Jpeg.

8 – Recycling the header to make a footer
Click the eyeball next to each of your text layers to hide them.Click Image > Rotate Canvas > 180°
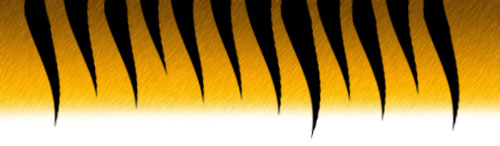
With the Move tool selected, move the black stripy layer down, so only the tips of the stripes are visible.Click on the "fur" layer, and Press Ctrl+T. Drag the top of the selection down, to make it narrower.
Use the Selection Tool to select the area you want, and click Image > Crop. This trims off the unwanted white space at the top.Click File > Save For Web, and save your image as a Quality 60 Jpeg.
| Tigerskin Photoshop Training We are experts in the field of graphic design training. We specialise in Adobe Photoshop, and run regular Photoshop tutorial classes. Student Portfolios Feel free to browse the web design and graphic design portfolios of our students. Legal Disclaimer We're not real tigers. We can't be held liable for any biting or clawing incidents that may occur. |
9 – The finished product
In your web editor, insert the images. I'd recommend using the font colours and styles I've used in this diagram. I'd also recommend that you make up your own text. :)Source: Putera30 PhotoGrapher And Designer
Source: Putera30 PhotoGrapher And Designer
Source: Putera30 PhotoGrapher And Designer
Source: Putera30 PhotoGrapher And Designer
Source: Putera30 PhotoGrapher And Designer

Very informative tutorial on web design.
ReplyDeleteThanks for sharing.